TigerJython4Kids
robotics Robotik
neopixel
Deutsch   English   

WORKSHEET 5: LIGHT SHOW USING NEOPIXELS


WHAT ARE NEOPIXELS?


In the near future, there will only be bulbs made up of LEDs. A LED is a semiconductor diode that converts the electrical current into light with high efficiency. Depending on the material of the LED, different colors are emitted. If you combine a red, green and blue LED in a housing, the result is a color LED that can be used to create any other color through additive color mixing. The principle is also applied to color television.

Color LEDs are sometimes combined with an electronic circuit (controller) in the same housing and cascaded one by one. This is great because only 3 cables are necessary to control each LED individually. Usually, the LEDs are mounted on a strip (LED strip). There are also rings or rectangular arrangements (LED matrix).

Below you will either use a LED strip, a LED ring or a LED matrix with at least 12 LEDs. These must have the type WS2812B. (Sources of supply: Electronics stores, Maker shops, Adafruit, Seed, Ebay, etc.)


PROGRAMMING WITH A BIG FUN FACTOR


A lighting system controlled by a microcontroller such as the micro:bit is extremely flexible and versatile. When writing the control program you can fully exercise your imagination. In this worksheet, you will learn about some basic procedures that helps you for your own project. The programming of lighting systems is also fun, because the effects of each line of code are immediately visible.
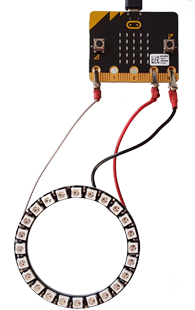
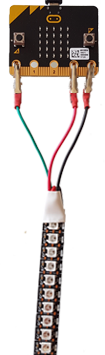


INTERFACING


For a simple test systems with up to some 24 LEDs, you can connect the LED strip, ring or matrix with three cables directly to the micro:bit.

Use the pins GND, 3.3V and P0. Make sure that you do not mix up the connections and that the terminals do not come into contact with adjacent lips.

Common are the following cable colors:
GND: black
3.3V (VCC): red
Data line (DIN): different colors


LED arrays are normally driven with 5V, but 3.3V is also possible with some loss of luminosity. For more then about 24 LEDs you have to power your arrangement with an external 5V power supply.


EXERCISE 1: SET COLOR OF PIXELS


To control the neopixels with one data line only, a serial protocol is used. In a sequence the 3 color values for the first pixel, then for the second, etc. are sent. The first pixel "snaps off" its three color values and forwards the remainder of the data stream. Under MicroPython, programming is very simple, as explained here:

After importing the module neopixel, create an object NeoPixel by specifying which data port is (usually P0) and how many neopixels your arrangement has, so for 24 LEDs attached to P0 (np is any variable name):

np = NeoPixel(pin0, 24)


The storage system now produces a list of 24 tuples that stores the RGB colors of the 24 LEDs (as (R, G, B) color values each in the range 0..255). The list index corresponds to the position of the LED (in a sequence depending on the wiring of the LED arrangement).

To set the color of the LED with index i, make a list assignment, e.g. for the first  LED with a red color

np[0] = (30, 0, 0)

or the second LED with a green color

np[1] = (0, 30, 0)

However,  this assignment only affects the list and is NOT automatically transferred to the LEDs.. To make any change of the colors visible, you have to send the list information to the LEDs by calling

np.show().

Program:

from microbit import *
from neopixel import *

nbLeds = 24
np = NeoPixel(pin0, nbLeds)
np[0] = (30, 0, 0)
np[1] = (0, 30, 0)
np.show()
► Copy to clipboard
 

As you can see, besides the module microbit you also have to import the module neopixel. If you forget the np.show(), you don't see any change in the colors, since your LEDs will not receive the data stream.


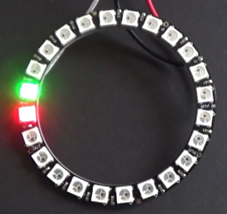
EXERCISE 2: LET A PIXEL RUN


In this exercise, try to make a single red pixel move endlessly from the beginning to the end. Use a suitable wait time between the pixel change (e.g. 100 ms). You can play around with the colors and waiting times.

Annotation:
To delete a single pixel, set its color to black with np[i] = (0, 0, 0). You can also delete all pixels with np.clear().


EXERCISE 3: GROWING COLORED WORM


It's funny to show a "worm" of color pixels. Starting from the erased state, the pixels should be switched on one after the other with the desired color until all the pixels light up. The process should be repeated endlessly with different colors.

It is best to write a function worm(color), which generates the worm. Invoke it endlessly in succession with the colors red, green, blue, yellow, cyan and white.


You can also show the worms without deleting the old one, so that all LEDs are always turned on.


EXERCISE 4: CONTROL ALL LEDs TOGETHER


For many color games you want to turn on all LED at the same time. Write a program that lights up all LEDs together in small brightness increments with a fixed color. The program should run endlessly and the largest color component should not exceed 30.

Do the same with different colors.


EXERCISE 5: FLICKERING CANDLES


Take the previous program, but set the color components at random. So if the current maximum color value is k, use the color

color = int(random() * k, int(random() * k,         int(random() * k)

You have to import the module random:
from random import *


EXERCISE 6: REALIZE YOUR OWN IDEAS


Create your own funny light show.